How to install a Let’s Encrypt SSL certificate on a shared hosting that does not support any “automatic” click-and-install method? SSL Certificates became almost mandatory for most websites since Google decided to reward websites using the secure HTTPS protocol, penalizing the others with security warnings that could intimidate users.
After few month other browsers, such as Firefox, followed Google’s policy in order to promote a more secure web surfing. Installing an SSL certificate became even more important than before.
We’ve already seen possible solution to the “this connection is not secure” warning appeared on most browsers. In that article, of which the english translation will be available soon, we talked about the free SSL certificates distributed by Let’s Encrypt, a free and open source Certificate Authority (CA) funded by the Internet Security Research Group.
These SSL certificate became very common in a short time, and many hosting providers include Let’s Encrypt certificate installation as a zero cost solution in their control panels, thus avoiding new expenses to the end user. Only a small fraction of the hosting provided decided to implement alternative solutions, such as Aruba, which is offering a free DV certificate signed by its own Certificate Authority, ore Namecheap, which is offering a Comodo PositiveSSL DV certificate for free, but just for one year.
Now, paying from 9 to 19€ per year for an SSL certificate can be annoying for many website owners and this is even more tedious if we have many domains. However, there’s still a way to obtain a free Let’s Encrypt certificate and make it update automatically, without the need for our intervention (except for the initial setup). We’ll see now how to install a free Let’s Encrypt certificate on a shared server with cPanel.
Hosting with cPanel, but without free SSL: how to install a Let’s Encrypt certificate?
Before to proceed in this tutorial, you have to check two things in order to see if you can install a Let’s Encrypt certificate:
- Our shared server must have cPanel as management panel, and not a proprietary solution
- Our shared server must allow SSH access (even if it’s a jailed shell its okay)
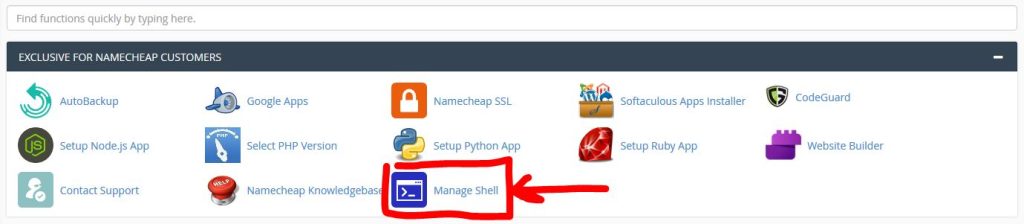
First things first, we need to activate SSH access on cPanel
How to activate SSH access on a shared server with cPanel
Usually, all the shared servers coming with cPanel allow us to access them via SSH. If we’re not sure if our provider allows it, or you cannot find the same icon shown below, sure you can contact their technical support for further confirmation.
Enable SSH access on a cPanel shared server is really simple. Once we’re logged to our cPanel, just search for the “Manage Shell” icon.
Then we can check if SSH access is already active, otherwise we can enable it: just click the selector shown in the image below if it’s not green.
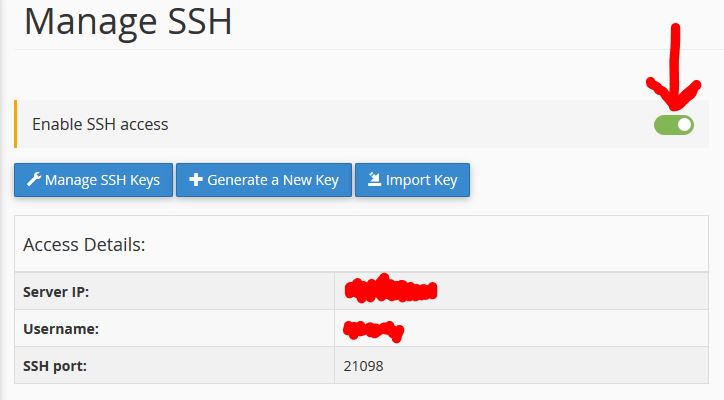
Once SSH is enabled, connection settings will appear below. Take note of the following:
- IP Address: it’s a number like 123.123.123.123 and it’s actually our server address (think of it as your home address).
- Username: this is the username we’ll use to access the server. It’s usually the same as our cPanel address.
- SSH port: a “port” is like a more specific coordinate for where the service (in our case, SSH) is enabled. It’s like a room in your house: where’s your SSH service? It’s in the living room! (21098).
How to install Acme.sh to manage Let’s Encrypt SSL certificates on our shared server
We’ll use acme.sh to manage our Let’s Encrypt SSL certificates. Acme.sh is a shell script (that means it works on terminal/ssh) able to automatize all the tasks needed to generate and install an SSL certificate in a (quite) simple way. However, we must install it first in order to use it: so don’t be scared by the picture and follow this tutorial steb by step.
First thing, if we’re on Windows, we’ll need an SSH client: latest Windows 10 version already have it, as they integrate openSSH in Windows PowerShell. If we have older version, such as Windows 7/8, we’ll need something like PuTTY. In this guide, we’re going to use PowerShell.
To open the PowerShell, justy type “powershell” and open it! This is how it looks like.

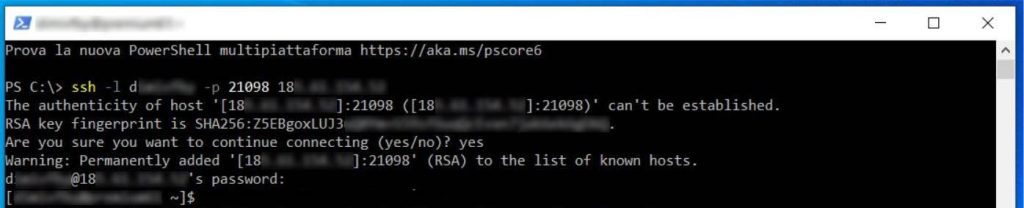
To install acme.sh, we need to connect to our server. This is the command we need:
ssh -l {username_cpanel} -p {porta_ssh} {server_ip}NOTE: obviously, you have to change the placeholder in the brackets with the real values (removing the brackets alltogether). This should be the outcome lookalike:
ssh -l yourcpaneluser -p 21098 123.123.123.123Press enter. Now, some servers may send an non-authenticated RSA certificate, which is still good for secutiry purpose on our SSH connection. If we’re sure about the informations sent (IP, username, port) we can confirm by typing yes. After, the server will ask for our passoword, which is the same as our cPanel’s. Just type it in.
NOTE: when typing after a password request, SSH hides the characters, so if you don’t see anything appearing on the screen it’s perfectly normal.
Siamo connessi!
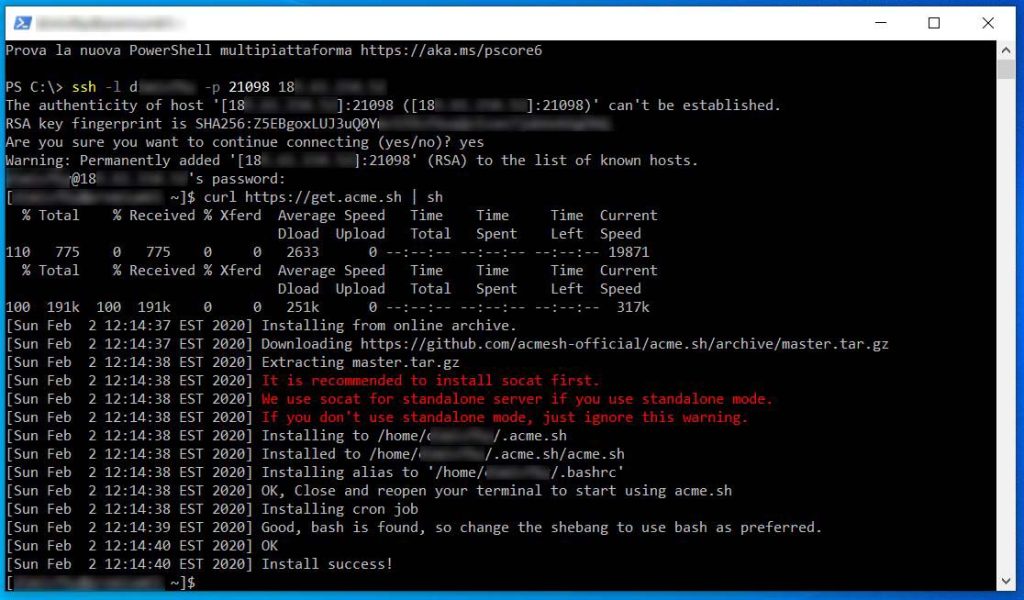
No, get Acme.sh by typing:
curl https://get.acme.sh | shPress enter. If everything is correct, this is what you’ll see:
Now we need to restart our connection, and connect back again, so that acme.sh will load some stuff.
To disconnect from the server, just type logout.
Create a Let’s Encrypt user and generate our first SSL certificate with Acme.sh
To use Let’s Encrypt, we’ll need to create a user first, in order to get updates notices about our certificates on the e-mail address used during the registration procedure. We can do this via PowerShell (or PuTTY, or terminal if we’re on *nix) thanks to acme.sh. Once we’re reconnected to the server, type:
acme.sh --register-account --accountemail {your email address here}Remember to change the placeholder brackets text with an actual e-maill address of your choice. If we own a domain, we could create an e-mail address only for this purpose, such as ssl@mydomain.com. Otherwise, if notifications does not annoy you too much, use your own.
This is what would happen in real world:

Now, before to generate our first SSL Certificate, we must check if everything it’s okay in acme.sh configuration. Acme.sh creates a cronjob on our server which is used to check expiration date on existing certificate and, if expired, renew them.
What’s a cronjob on cPanel? Nothing more that a scheduled task: it means that every day, once a day, acme.sh is going to check our certificates. We can check if acme.sh successfully managed to setup its cronjob by typing:
crontab -l | grep acme.shThis is the result:

Some stuff may be different in your view, such as the folder structure. However, with the given differences, this is what you should see.
How to create our first SSL Let’s Encrypt certificate with Acme.sh
Now that everything is ready to create our first SSL certificate issued by Let’s Encrypt, we can proceed with the following command from our PowerShell:
acme.sh --issue --webroot {domain root directory} -d {domain web address} --server letsencrypt --forceWhich translates in:

NOTE: On 1st August Acme.sh moved to ZeroSSL as default CA. ZeroSSL is still free, however it has some limitations over Let’s Encrypt which tends to be preferred by most users. You can still issue Let’s Encrypt certs by adding the command –server letsencrypt to the above string, or you can set it as default CA by using –set-default-ca –server letsencrypt.
Please pay attention to the domain root directory: it can often be something very simple, such as /home/domainname.com, or /home/public_html/, or even /home/www/. In our case, it’s so long because we were creating an SSL cert for a subdomain.
TIP: You can check the exact directory of the website from both your cPanel File Manager or by typing on terminal the following command:
uapi DomainInfo single_domain_data domain={domainname.ext} | grep documentrootThe directory will appear on your PowerShell.
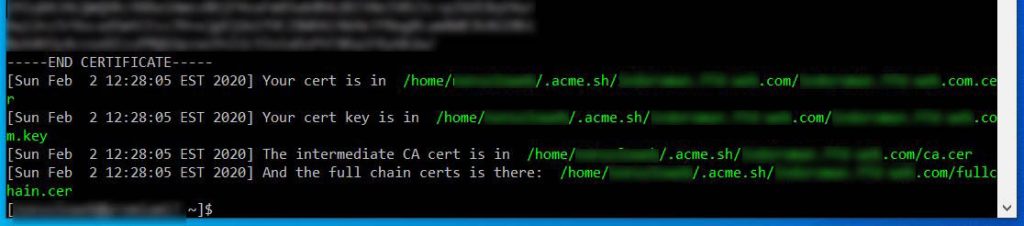
If we followed this tutorial correctly, a series of codes and number will appear on our shell. They’ll end up with some messages telling us where the certificate stuff is located on our server (that’s because a single certificate is composed by several parts). The directories are those in green in the screenshot below.
How to install our first Let’s Encrypt SSL certificate with Acme.sh
After creating a certificate, we need to install it on the domain, otherwise it’s just a bunch of files sitting somewhere in our server. To install it, just type:
acme.sh --deploy --deploy-hook cpanel_uapi --domain {domainname.ext}This command will be used by acme.sh itselft to renew the certificate every 90 days thanks to the cronjob we’ve seen at the beginning of this tutorial. This is the outcome:

We’re finished! Our Let’s Encrypt SSL certificate is working.
Our website will be accessible via HTTP after just a few seconds. If we want, we can set a HTTP to HTTPS redirect for all links: in this way we’ll be sure that all the users connecting to our website will use a secured connection.